Trigger Schedule
A trigger schedule is used to run repeating processes in the platform. It is triggered at a certain time, based on the cron job that is set in its configurations.
Common use cases:
- Running recurring aggregation
- Start a flow in multiple datasources
- Starting a time based process that has no incoming file to trigger it
Available triggers' technical names and versions are shown in the following table:
| Technical name | Description |
|---|---|
| bigquery_ingest | Aggregates based on a custom BigQuery query |
| flow | Executes a flow |
| vds_aggregation_ingest | Aggregates based on a particular configuration |
| virtual_datasource | Aggregates based on a simple configuration |
How to create Trigger Schedules with BigQuery ingest
For some business processes, running an automated Big Query is needed. For this, Energyworx has created the Trigger Schedule functionality. On this page, we will explain how to set it up, and how to easily connect it to a new Market Adapter and Transformation Configuration.
 Firstly, make sure you are on the correct environment and namespace of the Energyworx platform. Then, navigate to Trigger Schedule, under the Smart Integration tab.
Then, click on Create in the upper-right of the window.
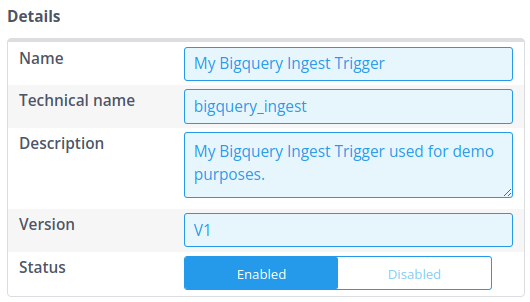
The “Create A Trigger” window pops up. In that window, we have sections called “Details”, “Trigger” and “Properties”. Firstly, we fill in the Details. For the Name, you can choose any descriptive name. The technical name, however, should be precisely “bigquery_ingest” such that the platform knows that it will be triggering a Big Query. Please fill in a good description and set the version to V1. Don't forget to set the Status to Enable, such that it is ran for testing.
Secondly, we fill in Trigger. This will be a CRON expression that makes it very easy to schedule automated processes based on UTC time. Don't worry if you don't know CRON expressions, the Console makes it very easy to create these CRON expressions.

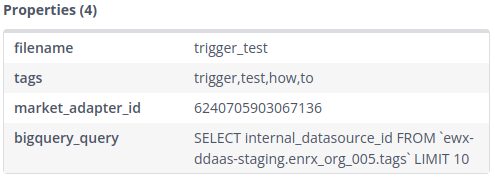
Lastly, we fill in the Properties. The needed properties are “filename” which is used to save to file to the File Management, “market_adapter_id” which is used to ingest the file, “bigquery_query” which is the query that creates the file (in CSV or JSON format), and with “tags” you can set the tags (comma separated) to the created file, which will make it easier to find it back in the File Management. Optionally, you can specify "format" (either "CSV" or "JSON") to control the output format - if not specified, it defaults to CSV.
After successful triggering, a new file should be present in the File Manager, with a file name consisting of the trigger name and the trigger datetime. Furthermore, the set tags are present, making it easier to find all files coming from this trigger schedule. Lastly, the market_adapter_id is directly set and used for ingestion.
![]()
Of course, you might want to create a new a Transformation Configuration with a Market Adapter. If you're new to creating a Transformation Configuration, please follow the page Transformation Configuration , and then overwrite the market_adapter_id in the trigger schedule.
The following video shows how to create these triggers:
If you want to make your queries interchangeable between namespaces a helpful approach is to use template replacement.
Your query can be used as a template where mappings for configurable fields in the bigquery query should be of format {'{KEY}': 'Value'} where it will replace any instance of '{KEY}' in query by 'Value'. You can specify these mappings in the parameter bq_template_mapping of your trigger.
Protected keys are {PROJECT_ID} and {NAMESPACE} which will fill automatically the current project id and namespace.
Export Format Options
By default, BigQuery trigger schedules export data in CSV format. However, you can also export to JSON format by specifying the format property in your trigger configuration.
Supported formats:
CSV(default) - Exports data as comma-separated valuesJSON- Exports data as JSON, with each row as a JSON object
The format should be specified as 'format': 'json' in your trigger properties. This is particularly useful when your data contains complex nested structures,
or when an export contains data for multiple datasource and you need to ensure that the data for a single datasource is not split across multiple files.
Common pitfalls
Ensuring Single CSV File Output from Triggers
Scenario: You have configured a trigger schedule to execute a SQL query and output the results to a CSV file.
Issue:
In some cases, instead of generating a single CSV file containing all the query results, the trigger may unexpectedly produce multiple CSV files, even when the total data volume is below the threshold that would normally necessitate splitting files.
This behavior has been observed specifically when the SQL query used within the trigger configuration does not include an ORDER BY clause. The lack of explicit ordering can sometimes lead the underlying data processing mechanism to generate output in separate chunks or streams, resulting in multiple files.
Resolution / Workaround:
To ensure that the trigger reliably generates a single CSV file containing all the rows returned by your query (assuming the total data size does not exceed platform limits requiring splitting), add an ORDER BY clause to your SQL query.
By specifying an order, you typically force the query engine to collect and sort all results before outputting them, which leads to a single, consolidated file.
Example:
Query potentially causing multiple files:
    SELECT identifier_column, data_column_a, data_column_b
    FROM `your_project.your_dataset.your_table_or_view`
    WHERE some_condition = TRUE
    AND CURRENT_TIMESTAMP() BETWEEN valid_from_timestamp AND valid_until_timestamp
Query modified to ensure a single file:
    SELECT identifier_column, data_column_a, data_column_b
    FROM `your_project.your_dataset.your_table_or_view`
    WHERE some_condition = TRUE
    AND CURRENT_TIMESTAMP() BETWEEN valid_from_timestamp AND valid_until_timestamp
    ORDER BY identifier_column -- Added ORDER BY clause
Note: While this workaround addresses the unexpected splitting, triggers will still legitimately create multiple files if the result set is very large and exceeds configured file size limits. The ORDER BY clause specifically helps prevent unintended splitting for smaller result sets.
How to start a trigger schedule from the API
A trigger schedule is generally started by a cron job, when it is scheduled to run. However, in some cases it is necessary to manually start a trigger schedule, for instance during testing. This is possible through the API, following the steps below:
- Go to the Trigger Schedule page under the Smart Integration tab
- Find the trigger schedule you want to run and copy the trigger id (this is different to the market adapter id). Make sure the trigger is set to Enabled. If it’s Disabled, executing the trigger will be rejected
- Go to API Documentation page under the Support tab
- Find the Trigger tab and look for the call
POST /ewx/v1/trigger/execute - Click the right panel with example values to copy over the text to the body, and substitute the id with your copied id from step 2
- Click try out - if successful you will get a 200 code as the response